UHF to 70 Centimeters Ham Mods
These instructions assume that you have a UHF manual
1. Wire a 10k resistor in series to pin 8 (audio squelch) of control board and Pin 27 of control Plug for COR
2. Cut Trace 7 on control board at JU905 jumper see diagram page 8-4. This removes 9.8v that is used to mute receiver when transmitting.
3. Make receive coax and plug into the receiver.
5. Add jumper wire to ground. For single frequency see dotted line on control board diagram at bottom of control board marked JU909. (1 Freq. models only)
6. Jumper 5 to 6 on K902 (relay) in center of control board. (see page 8-4). This maintains power to receiver when you transmit.
7. Connect a wire from pin 11 of control board (audio squelch) to Pin 28 of control plug for PL operation. Insert a 10k resistor in this line to help with the PL hum . This is speaker audio. If you want to use discriminator audio, connect a wire from Pin 3 of audio squelch board to Pin 30 of control board. This is discriminator audio without the hum of speaker audio.
8. You can remove the board next to the crystals.
9. If you remove the PL encoder, you must jumper audio squelch board at JU201. (Page 8-1) This jumper, if in place will not let the audio filter filter PL tones.
10. You must short AFC to ground on receiver board. There is a hole marked AFC on cover. (rear left if facing micor)(Hugh does this when he tunes)
11. If you run the encoder, you must clip the jumper (JU404 see page 9-2b) If you remove the encoder, you must have the jumper in or the radio will not work.
Tuning Receiver (Page 6-2)
The following steps are listed above and are the only mods needed to tune the radio.
1. Jumper Channel Elements to Channel 1 JU909 control board. (Page 8-4)
2. You must short AFC to ground on receiver board. There is a hole marked AFC on cover. (rear left if facing front of micor)(Page 8-3)
3. Jumper JU-1 for wide spacing or repeat operation must be installed. (JU 1 is in rear of control board) (Page 4-22)
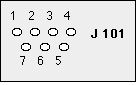
Pin numbers refer to J101 on receiver board.
1 Channel Element

2 1st Doubler Output

3 2nd Doubler Output

4 Discriminator

5 IF
No RF injected at this point. Set the meter to -DC and connect the red lead to to pins below. Connect black lead to case of radio.
|
Step |
Test Pt. |
Description |
Coil # |
|
1 |
Pin 1 |
Peak |
L101 |
|
2 |
Pin 1 |
Peak |
L102 |
|
3 |
Pin 1 |
Dip |
L103 |
|
4 |
Pin 2 |
Peak |
L103 |
|
5 |
Pin 2 |
Peak |
L104 |
|
6 |
Pin 3 |
Peak |
L105 |
|
7 |
Pin 3 |
Slightly Peak |
L106 |
|
8 |
Pin 3 |
Slightly Dip |
L102 |
|
9 |
Pin 3 |
Slightly Peak |
L101 |
|
10 |
Pin 3 |
Peak |
L101 |
|
11 |
Pin 3 |
Peak |
L102 |
|
12 |
Pin 3 |
Peak |
L103 |
|
13 |
Pin 3 |
Peak |
L104 |
Set generator for 11.7 MHz. and put -DC meter on Pin 4.
Inject RF with PL-259 into L110 hold on receiver shield be careful not to touch board or shield. Adjust L109 for 0 meter reading. Set this one time and leave it. If you change the crystal, L109 will change and you will get in a cycle.
Move -DC Meter to Test Point 5.
Open squelch.
Inject strong RF signal, Input of repeater in receive antenna (go directly into receiver). Adjust L111-L116 to hear signal. Just turn until you find the signal. This may be difficult. I had success by turning all coils in and then turning them out 1 turn at a time. I think you should leave L106-L108 alone until you get a meter reading.
As soon as you can hear the signal fairly strong, put -DC meter on Pin 4 and set generator for repeater in to maximum. Adjust F1 of channel element for 0 meter reading.
Move -DC meter back to test point 5. Bring down and peak.
Re-peak L106, L107 and L108.
Continue until no improvement.
Peak L110 with meter on test point 5. I found that on radio #28, backing off the peak would improve the sensitivity. Hugh said it might be okay. Did not find this on # 32
Go back to Pin 4 and set Channel Element to 0 Volts with strong repeater input signal.
Check for 20 dB quitting
Page 5-18
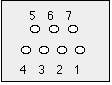
Control Board Test Pins
1 Receiver Audio

2 Receiver Audio

3 No Connection

4 9.6 Volts Regulated

5 PTT

6 Chassis Ground

7 Transmitter Audio

Place AC meter on lowest scale and connect to test point 2 of control board.
Open squelch.
Turn volume up until meter reads 0 dB on dB scale.
Inject 0 mV through antenna connector (repeater input frequency) and turn up until meter reads -20 dB.
Tuning the Exciter
1 No Connection
2 Standard Channel Output
3 Wide Space Channel Output (split)
4 Wide Space Offset Osc. Output
5 1st Low Level Amplifier
Step 1
Do not have to tune L401-L407 they are for simplex.
Turn power setting CCW.
You do not have to remove anything if you have a RF sampler. (Go to step 2)
Remove test point (bottom of radio) and remove red wire going to pre-driver.
Remove coax RCA plug going to pre-driver.
Remove pre-driver.
Note the position of white, green and black wire.
Connect male RCA coax plug to female RCA plug closest to heat sink.
Connect other end to SA500 Spectrum Analyzer input.
Step 2
If you are using an RF Sampler, connect the sampler output to the input of the spectrum analyzer. Using a hand held, align the repeater output frequency in the center of spectrum analyzer (443.100 Mhz). Key the handheld to be certain you are looking at the correct frequency. Use the frequency counter to determine if you are on the correct frequency. (After you have tuned and have power) If you see no signal on the spectrum analyzer, the PA will not produce any power. You have tune to find a signal and unkey to get the PA to work. I can always find a signal by turning L302-L307 fully CCW and turning each about 1 turn until the signal appears. The one that always appears is 458 MHz. I found the correct frequency by continuing to turn each coil about 1 turn at a time. On the radios I have tuned, the lugs are about 1/4 inch above the metal case of the coils. Adjust L302-L307 until you find strongest peak. Continue re-peaking all coils for strongest signal. Unkey and turn the power up and check the output.
Step 3
Re-install pre-driver if it was removed.
Connect positive red lead of +DC meter set lowest scale to plus 12 volts (You get the 12 volts from your power supply) Connect black lead to Pin 5 of exciter test point. Key with power control fully counter clockwise.
Peak L302 through L307. Peak L301. L301 is very touchy so you may have to remove tuning tool to see change.
Setting Transmit Frequency:
Checking page 5-36 - Adjusting page 6-6
Set service monitor (measure receive) to 16.7 MHz. and put in TP302. You can also try TP 301 or TP 401. The manual says to touch TP 302 with center of PL 259 and clip shield to ground (not shield).
Key Transmitter, adjust STD FREQ warp coil) to 16.7 MHz. +/- 0 c/s on the frequency counter. (STD FREQ is to the left TP401)
Set service monitor (receive) to repeater output frequency. Put € in TP302 and key transmitter. Check for repeater output frequency +/- 0 c/s on frequency counter. Adjust channel element (F1) to center output frequency if needed.
Setting Deviation:
Set up for deviation and adjust IDC STD for +/- 5 KC max.
Formula for the frequency that you will need to order.
I've found that it's better to just send the channel elements back to the crystal company and let them install the crystal and compensate the elements. It costs a little more to do this but the channel elements will be much more stable because critical parts generally have to be changed and the factory has the equipment to do the temperature checks etc... If I remember correctly, the UHF elements are KXN-1024A (standard element) and KXN-1029A (high stability). Which ever one comes in your radios should work fine. I have had good luck with International Crystal for UHF channel elements.
Formula:
Ch. ele. carrier freq. = Repeater rec. freq + 23.4 MHz.
Therefore, 448.100 + 23.4 = > 471.500 MHz. <
If you just tell them that you need the elements re-crystalled and compensated for Receive 471.500 MHz., they should work out correctly for your frequency. Let me know if you have any questions.
Carrier operated PL Tone.
Radio Shack cat no. 276-2072A IFR510 Power MOSFET N-Channel.
![]()
Connect Pin 8 of audio squelch to gate. Connect on the control board before the 10K resistor that is connected to Pin 27 of the main plug that goes to the controller for COS. COS is 6+ volts when no carrier is detected and goes to zero when the squelch opens.
Connect the Drain to Pin 701 of the encoder board. This pin normally has about 5.3 v to the base of a transistor. When this pin is grounded, the encoder does not transmit the PL tone.
Connect the source to ground.
 Go to the
SiliconValley GeoCities
Go to the
SiliconValley GeoCities